


Fitting New Body to Frame
After media blasting was completed and an inspection was done of the body and sheet metal parts it was determined that previous body work and rust repair work had been to the body. We decided to call our friends at Omix-ADA for information on their body kit and was offered a new Rugged Ridge body kit for our build.
Our new Rugged Ridge body arrived via truck and the two pallets were quickly unloaded.

Once inside the shop we opened the crate and inspected the body tub. WOW, it was great!

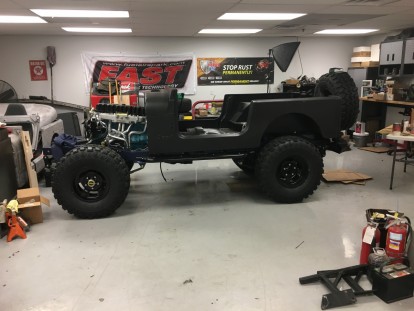
When the body tub was completely unpacked we got out the chains and carefully lifted the body onto our painted frame to check the fit.

We used a one inch body lift kit to assure proper clearance with the tires.

Not everything fit perfectly and several firewall holes needed to be enlarged or moved slightly.

We added holes in the dash for a factory tach and clock.

The remainder of the body panels are now fit to the body and frame.
Dashboard and steering column in place.


None of the cowl vent grill holes were in place. The holes for mounting the heater defroster box needed to be counter sunk into the cowl.

Clearance between our intake, headers and steering is checked and good.
Now that the body is in place we are able to test fit the power steering ram. Once set into position the ram brackets can be welded to the front axle and tie rod linkage.


Ram installation complete.
