Scott Helliesen
Posts by Scott Helliesen for 1966 Ford F100 Build:
Final Frame assembly
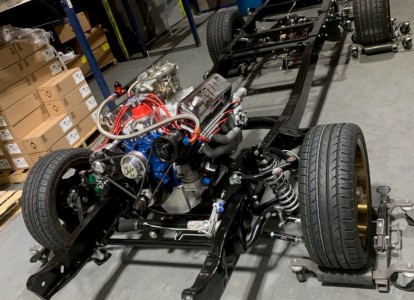
After the POR-15 Rust Preventive Coating dried we reassembled to suspension, mounted the engine and transmission and completed any remaining issues with the frame build. Front suspension installed.
Engine and Transmission
After removing the engine and transmission from the truck each component was sent out for rebuilding and when they returned were coated with POR-15 coatings.
The 3 Step POR-15 Stop Rust System
Our media blasted frame is ready for the POR-15 3 Step System to be applied. Bare blasted frame.
Preparing for Media Blasting
With the body removed from the frame we moved back into the shop area Removing suspension and preparing for blasting. Rear suspension removed.
Truck Cab Removal and Test Fitting QA1 Suspension Kit
With the stock leaf springs and twin I Beam suspension and all mounting brackets removed from the frame we're ready to test fit the QA1 Suspension Kit. The kit comes complete with all mounting hardware and complete directions.
Removing Engine, Transmission and Front Suspension
With temporary wheels and tires on the rear the truck is back on the ground and in position for the removal of the engine and transmission. When that's completed we will move on to removing the front suspension as well as the cross member to allow the installation of the QA1 upgrade kit.
Removing the Rear Suspension
With the truck bed removed we now have access to the rear suspension. We will be upgrading both front and rear suspension using QA1's Coil Over Conversion kit. This requires removing leaf springs and leaf spring mount brackets as well.
The Disassembly Begins
Our '66 F100 has been running for years on both the street and an occasional visit to the strip. We decided it was time for both a restoration as well as an all around upgrade to engine, transmission and suspension. Stay tuned for updates as we prepare to display the completed rolling frame in our POR-15 booth at SEMA '19.
